Academic Calendar
Setup Data: Session times
This pages describes the Session Times tab of the Setup Data form.
On the session tab page there is a grid in which you can enter or edit the sessions for a normal day.

Each session must have a name, a start time and an end time.
The sessions should include not only the normal timetable slots but also any other sessions on which you may want to want to base calendar appointments, such as Morning Briefing and perhaps after-school sessions for meetings or extra-curricular activities.
Times
When you enter a time it should have a colon between the hours and minutes. If you enter a full stop (period) then it will be converted to a colon.
You can enter times in any recognised format – AM/AP or 24-hour.
ACal will try to work out the default length of your sessions. To start with it is an hour but if you enter two consecutive sessions with the same session length that becomes the new default.
As soon as you change the time in a row and move off that row the sessions will be resorted in time order.
ACal will prevent you from entering a Start time that comes after an End time or and end time that comes before a start time.
Timetabled?
The print out features include options to print out only the details of timetable sessions for things such as lesson plans and equipment requests. To ensure this works correctly tick the Timetables box only for those sessions that are timetabled teaching sessions. This is also important if you later import timetable details from SIMS or any other system as you will have to match the timetable sessions as recorded in those details with those declared as timetabled here.
Non-standard days
The sessions you have defined are for a normal day. If you have some days in your regular timetable sequence that have a different set of sessions and times then you will need to define one or more extra types of day, each with its own set of sessions. An example would be a school that had the normal pattern of sessions on Monday to Thursday, but had an earlier finishing time on Friday and had a teaching session less than in the normal Day pattern. If this is the case, tick the box at the foot of the page.
![]()
You will be asked to give a name to the new type of day.
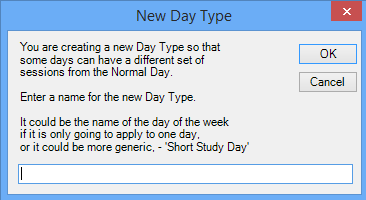
Give a short name that describes the day, such as “Early finish”.
You will then be given a choice.
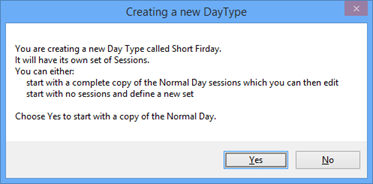
A new tab will be created for the new day type.
If you chose the option to copy the sessions for a normal day they will all be there ready for you to edit and make the changes that make this day type different.

Assigning Day Types
When you create the first additional Day Type a new tab is created.
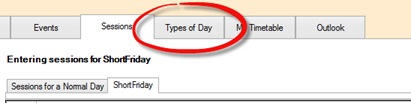
This is because now there is more than one type of day ACal“>ACal needs to know which to use for each of the days of the working week.

In the image the user has clicked the drop-down for Friday. In this case there are two types of day available.
Working with a grid
Icons
The grid has a grey margin down its left hand side.
|
|
A right-facing triangle in the margin indicates the current row. |
|
|
When you start to enter or edit a grid row a pencil icon appears in the margin. |
|
|
A star in this margin means that the row next to it is available as a new row. This will always be at the bottom of a grid below the other rows. To start a new row just click or move to this row and any defaultentries will appear. You can accept or change them. If the row with a star is not visible just scroll to the bottom of the grid. If it is not that then you are not allowed to add a new record. |
Moving around
Use the Tab key to move to the next cell in the grid. You can use the arrow key or the Enter key but the Tab key has the advantage that at the end of the row pressing Tab takes you to the start of the next row.
Deleting a row
To delete a row click the grey margin to its left. The whole row will highlight to show it is selected. Press the Delete key on the keyboard and the row is deleted.
Sorting
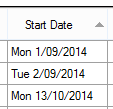 |
In some girds the records are in the order they are entered but in many cases it is more sensible for them to be sorted.In this image the triangle in the header of the Start Date coolumn indicates the the records are sorted on the start date. If you enter a new record it will jump to the correct place in the sorted list.In some case you can click on a column header to sort the gird by that column. If you click a second time the sort direction reverses. |