Academic Calendar 4.1
Managing Many Calendars: Importing Staff
The wizard will take your through the four steps necessary to import staff details.
If you have not imported staff before there are four steps to go through.
1. Locating the staff data file you prepared
2. Identifying the headings in the data file
3. Linking headings in the data
Once you have imported the details they are saved so the next time you run the wizard your are taken straight to the final screen of this sequence to review the staff data already imported.
Locating Staff Data
You will need to import a list of the email addresses of the staff whose calendars you want to work on. ACal will accept either CSV or XML formats.
If you want to import timetable details you will also need something that ACal can use to link the timetable data for each member of staff to their email address. What this is varies from system to system, it could be a staff two- or three-letter letter code, an ID number or the full name in the format that is used in the timetable data for each member of staff.
You will probably need to create this file by exporting from your management system. If in doubt you may need first to look at the timetable export file you intend to use to see whether it uses a letter code, an ID number or a full name.
The TimeTabler import options all use a two or three-letter staff code. So do Engage and Tabulex. The SIMS XML files use the full name as formatted in SIMS.
When you click the Next button a dialogue box opens for you to find the file you want. You can navigate anywhere on your system but only CSV and XML files will be shown.
A typical file exported from your management system as a CSV file and viewed in Excel might look like this.
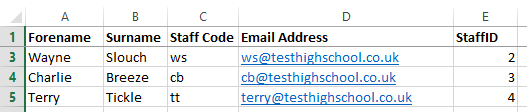
In practice this has more information than you are likely to need. If you are importing from TimeTabler all you need is the email address and the staff code.
If you intend to import timetable details from a SIMS XML file then all you need is the email address and full name for each member of staff. The exact format of the full name will depend on how SIMS has been set up. It may include the first name or just an initial. It should match the way names are shown on the SIMS timetable.

Identifying staff data headings
When you click OK to select the file ACal examines the structure of the file you have chosen and displays the headings it uses. Beside each heading is an example in brackets of the data stored under that heading.
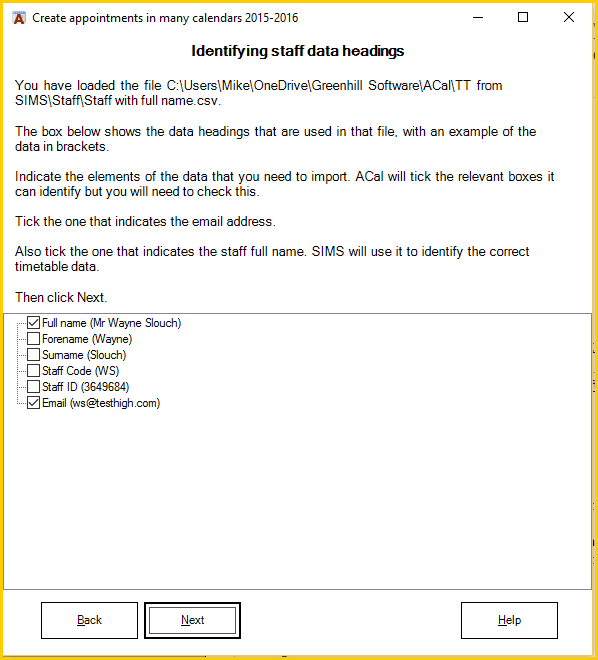
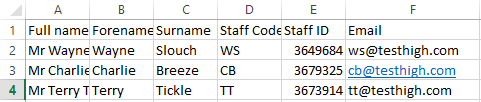
The screen above has quite a long list of tick-boxes because it reflects a staff data file that was created to cover all possibilities. The file contents are shown below so you can see where the headings came from.
There may be more data than ACal needs so you must indicate which items of data to import.
Click the heading for the email address.
If you want to import timetables you must also click the heading that will provide the appropriate link to the timetable data:
- if you will be using a SIMS XML file click Full Name
- if you will be using a TimeTabler, Engage or Tabulex export file click Staff Code
- for other systems you will need to find what is needed.
When you click next ACal imports the data for the headings you have ticked.
If you did not choose to import Individual timetables and you ticked just one box on this page then ACal assumes that it was the email field and goes straight to displaying Staff Data.
Linking staff file headings
You have told ACal what data you need to import but it does not yet know where to put it in relation to its own data structure.
This screen displays two, three or four drop downs to reflect the number of boxes you ticked on the previous screen. In the example below the staff data file that was imported contains the email address, staff code and staff ID for each person.
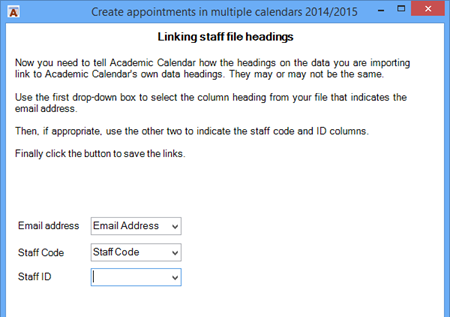
Click the drop down labeled Email address and you will see a list of the headings for the data you just selected for import. Select the one that indicates the email address. It may be exactly the same wording or it may be some other name your system uses.
ACal will try to make the correct selection for you but you should always check the entries it has selected.
If you are going to import timetable data you will need to do the same with either Full Name, Staff Code or Staff ID.
If there are more drop-downs than you need you will be leaving the ones you do not need blank.
Press the Next button when ready.
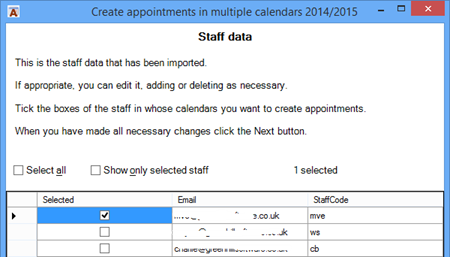
Staff Data
This screen displays the staff data you have imported.
If you run the wizard having previously run it and imported staff then you will be brought straight to this screen. If you want to start again with locating a data file to import then click the Back button.
Here you can check that the imported details are correct and select those staff in whose calendars you want to make appointments.
An option at the top of the grid makes it easy to select, or de-select, all the staff in one go.
A second option allows you to show just the staff selected. Un-ticking the box will show all staff.
If you want to add staff scroll to the bottom of the list and type their details in the row that has a star in the margin on the left. When you are typing in the row the star changes to a pencil. When you move off the row the pencil disappears. Any changed or added details will be saved in ACal‘s data but not your original file.
If you want to delete a row click in the margin just to the left of the row concerned. The whole row will turn blue to show it has been selected. Now press the Delete key on your keyboard.
The staff details will be saved when you close the form. They are stored in a file called ACalManagerData.xml in the ACal Data folder. You can see this by clicking on the Open data folder button in the Utilities section of the ACal ribbon or tool bar.
Click Next when ready. If you did not choose to import individual timetables you will proceed either to connect to Exchange or to send emails with the data, according to the option you chose.
When the import of staff data is complete the page you go to when you click Next will depend on the options you chose at the start of the wizard.
If you chose to import timetable data you will be taken to the appropriate page.
If not, you will be taken to the page to confirm or change the colour-coding you want applied to your appointments
Read about importing timetable data
Read about colour-coding appointments