Academic Calendar
Setup Data: Term Dates
This page describes the Term Dates tab of the Setup Data form.
Terms are the blocks of weeks and days that comprise the academic year. You may call them terms, half-terms, semesters or something else.
This is the grid you use to enter the term blocks.
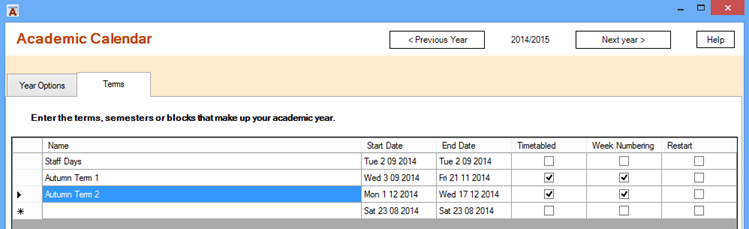
These entries have two functions. They are used to create all-day appointments that indicate the current term including, when appropriate, week numbering and the timetable in force. They are also used by the “Create new appointment by period name” feature to indicate whether the day is timetabled and, if so, which timetable is in force.
Start and End dates
Each term must have a name, a start date and an end date. The default entry for the first start date is the first day of the first working week after the start date of the academic year. The default entry for the end date is the last day of the working week five weeks after the start date. You can change both of these dates. In practice a term may need more than one entry if there is a holiday or other non-timetabled days within it. For this reason we describe the entries as “term blocks” as each one might only be part of what you call a term.
Start and End dates, once entered, show the day of the week as well as the date. You do not need to enter the day, just the date. You can either just start typing the date or click on the date cell causing the date-picker drop down arrow to appear. Click the drop-down arrow and navigate to the appropriate date. Alternatively, once you are in the cell (and just a part of the date is highlighted rather than the whole thing) you can hold down the ALT key while you press the down arrow on the keyboard. This will show the date-picker and you can navigate it with the mouse or keyboard (Page Up and Page Down to change months, arrow keys to change date and Enter to select the date).
Academic Calendar will prevent you from entering a Start date that comes after an End date or and end date that comes before a start date.
Timetabled?
If you tick the Timetabled box for a term it will be treated as timetabled. Most terms will be timetabled but this allows you to include “term blocks” that are not timetabled. One use for this would be to include special days or weeks – staff training days or activity weeks – that are not timetabled. The “Create new appointment by session name” feature uses this information to know whether to offer the sessions of a timetabled day in the new appointment dialogue. If the relevant day is not a timetabled day then the timetable session names do not appear in the New Appointment form.
Do not create overlapping “term blocks”. For example, if there is a non-timetabled day in the middle of a half term you will need three entries – one for the first part of the half term (timetabled), one for the non-timetable day, and one for the second part of timetables half term.
Week numbering
If you tick the Week numbering box then weeks will be numbered from the first week of the academic year. If you tick Restart then the numbering will restart at one for the first week of that term block.
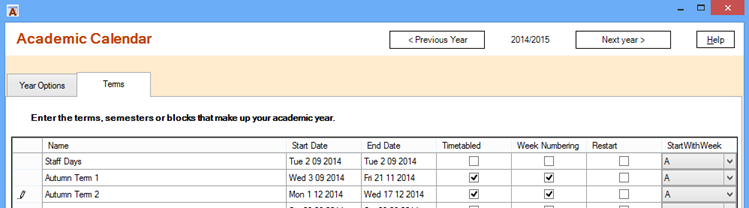
Two week timetable
If a two-week timetable is in force then there will be a column headed Start with Week. To make an entry on this column click the drop-down arrow (or hold down ALT and press the down arrow key) and select the relevant week. Usually the weeks just alternate but sometimes this may not apply.
If a day-count cycle is in force than the last column allows you to set the start day for each term.
Previewing appointment text
If you go on to make Term Date appointments an all day appointment is created for each week or part week of the academic year.
These act as headers for your calendar and are particularly useful if you have a two-week timetable sequence.
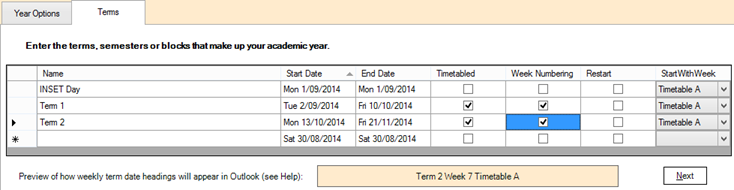
At the bottom of the form is a preview of what the subject line of these appointments will be like. It changes as you move from row to row in the grid.
It is made up of up to three elements. The first is the name of the term block as you have entered it in the grid.
The second is the week number and only appears if ‘Week Numbering’ is ticked for that term block. The word ‘week’ is configurable from the form reached by clicking the Options button on the ribbon. The options allow you to change the terminology used to reflect your own practice and environment. They do not change any wording in ACal“>ACal itself but they do control any wording that ACal“>ACal inserts in appointments and printouts. This feature could be used to for languages other than English or just to change the English terminology you prefer.
The third element is only relevant if a two-week cycle is in operation. It is the name of the timetable week as entered on the Year Options tab. It only appears two-week timetabling is in operation and the Timetabled box is ticked.
In the image below the preview panel shows the composition of the texts for appointments in Term 2. The number is an approximation only but it would show 1 if the Restart Numbering was ticked.
Working with a grid
Icons
The grid has a grey margin down its left hand side.
|
|
A right-facing triangle in the margin indicates the current row. |
|
|
When you start to enter or edit a grid row a pencil icon appears in the margin. |
|
|
A star in this margin means that the row next to it is available as a new row. This will always be at the bottom of a grid below the other rows. To start a new row just click or move to this row and any defaultentries will appear. You can accept or change them. If the row with a star is not visible just scroll to the bottom of the grid. If it is not that then you are not allowed to add a new record. |
Moving around
Use the Tab key to move to the next cell in the grid. You can use the arrow key or the Enter key but the Tab key has the advantage that at the end of the row pressing Tab takes you to the start of the next row.
Deleting a row
To delete a row click the grey margin to its left. The whole row will highlight to show it is selected. Press the Delete key on the keyboard and the row is deleted.
Sorting
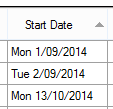 |
In some girds the records are in the order they are entered but in many cases it is more sensible for them to be sorted.In this image the triangle in the header of the Start Date coolumn indicates the the records are sorted on the start date. If you enter a new record it will jump to the correct place in the sorted list.
In some case you can click on a column header to sort the gird by that column. If you click a second time the sort direction reverses. |