[vc_row][vc_column width=”1/1″][vc_column_text]
Academic Calendar
Managing Many Calendars: Impersonation in Exchange
This page gives help on giving an admin user Impersonation rights in Microsoft Exchange. This allows an admin user to create appointments in the calendars of other users. It is required if you intend to use the Manage Many Calendars wizard to create appointments in Exchange.
The sections below give links to relevant documentation
Office 365
Read a concise guide [wpi_designer_button text=’Configuring Exchange Impersonation in Office 365′ link=’http://cloudfinder.com/user-impersonation-settings-office-365/’ style_id=’13396′ target=’self’]
Exchange Server 2010
Read the official Microsoft documentation on [wpi_designer_button text=’Configuring Exchange Impersonation in Exchange 2010′ link=’http://msdn.microsoft.com/en-us/library/bb204095.aspx’ style_id=’13396′ target=’self’]
Exchange Server 2007
Read the official Microsoft documentation on [wpi_designer_button text=’Configuring Exchange Impersonation in Exchange 2007′ link=’http://msdn.microsoft.com/en-us/library/bb204095(v=exchg.80).aspx’ style_id=’13396′ target=’self’]
The Exchange 2007 article refers to Exchange Web Services. This is the service that ACal uses. The article does not actually talk about this, just how to set up Impersonation on Exchange so it is ready for Exchange Web Services to be called by ACal.
If you do not like the Microsoft documentation
The Microsoft articles are rather concise. If you prefer something fuller the account below is a shortened version of a blog by Bruce Gruenbaum. The blog was written for an audience of programmers so I have just reproduced the parts about setting up Exchange. You can read the full blog at The Software Gorilla
[/vc_column_text][/vc_column][/vc_row][vc_row][vc_column width=”1/1″ css=”.vc_custom_1427307240439{background-color: #ffffff !important;}” popover_placement=”top”][vc_column_text css=”.vc_custom_1427360820331{padding-top: 40px !important;}”]
What is Exchange Impersonation?
Exchange Impersonation is a mechanism that allows a single Windows Active Directory account to act on behalf of other users on a Microsoft Exchange mailbox as if they were performing the action themselves. In other words, assuming I create an Active Directory logon called Impersonator, and I give Impersonator Exchange Impersonation privileges for users WSL, TTI, and CBR, Impersonator can perform any action that WSL, TTI, and CBR can perform on their mailboxes.
So what we are going to do is create the Impersonator account and then set some permissions on both the service and the user accounts that will allow the service account to act on behalf of the user accounts.
User Accounts, AD Accounts, and Mailbox Accounts
For the purpose of this article consider four users:
- Freddie F. Frogg (froggf@example.com)
- Harriet H. Hippo (hippoh@example.com)
- Edward E. Elifant (elifante@example.com)
These three users are all teachers, in a fictitious school, so I have added them to the Staff user group.
So that we are using a common set of terms, I am going to call these the user accounts. There’s a subtlety here, though, that I need to make sure you understand: Freddie F Frogg has two accounts that we care about:
- His Active Directory account that gives him permission to logon to the domain. I’m going to refer to this as his Active Directory Account (or AD Account); and
- His Exchange Server Mailbox that is used to pick up e-mail and change his calendar. I’m going to refer to this as his Mailbox Account.
The AD account has to have access rights to a corresponding Mailbox account in order to receive mail, etc., but an AD account can exist without a corresponding Mailbox account. The three accounts that I mentioned above are created in the Active Directory and then a corresponding mailbox is created for them on the Exchange Server. This is standard Exchange Administration. So these three user accounts consist of an AD account and a Mailbox account.
The Impersonator Account
As I described earlier on, we’re going to create an account called Impersonator that will act on behalf of the three user accounts.
So what we are going to do is create the Impersonator account and then set some permissions on both the Impersonator and the user accounts that will allow the Impersonator account to act on behalf of the user accounts.
My Configuration
Just so you have a point of reference, I am running two versions of Exchange – Exchange 2010 and Exchange 2007 SP3.
The Exchange 2010 server is running on a Windows 2008 R2 machine.
The Exchange 2007 server is running on a Windows 2008 SP2 machine.
In both cases, the Active Directory is running on a Windows 2008 R2 domain controller.
I am going to be using command line utilities to get things set up for Exchange Impersonation, and you may find that if you are doing things on a different combination of operating system and Exchange server, that things look or are slightly different. Consult the documentation for your combination and hopefully the differences are not too big.
Adding the AD Account for the Impersonator Account
There is really nothing special about adding the AD account for the Impersonator Account. It is simply a normal user in the domain.
Log on to the Active Directory server and simply add an account with whatever username you want to add. (In the image the name is “”EWSProxy””)
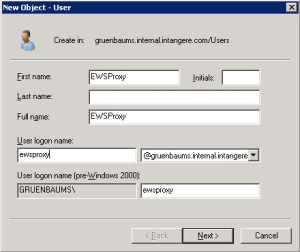
On the next page of the wizard, you are prompted for the password for this account. It’s important to make this a tough password and it’s also probably worthwhile setting the Password never expires flag, as this is intended to be a service account, and changing the password will affect the service as well.

Applying Permissions
There is a marked improvement in the design of the 2010 release over the 2007 release.
Exchange Server 2007 makes use of Access Control Lists (ACL) to apply the permissions. You apply two rights; one that authorizes the Impersonator Account access to Exchange Impersonation rights on the Client Access Server (CAS), and the other that is applied to either an AD account or an entire Mailbox database. This is somewhat kludgey because you either do it on an account-by-account basis, or you do it on an entire mailbox database.
Exchange Server 2010 allows a much finer-grained control of the application of permissions because it makes use of Role-Based Access Control (RBAC) to apply the permissions. Instead of applying the tokens to an account or a mailbox database, you can define a scope to which the permission applies. This means that you can get all the users in a group, for example, and set the permission for that scope.
So let’s deal with applying these permissions to each of the server versions, one by one.
[/vc_column_text][/vc_column][/vc_row][vc_row][vc_column width=”1/1″][vc_tabs interval=”0″][vc_tab title=”Exchange Server 2007″ tab_id=”def1427305949-1-76″][vc_column_text]
Applying Exchange Impersonation Permissions on Exchange Server 2007
As I mentioned, Exchange 2007 requires that you apply two rights to be able to get Exchange Impersonation working:
ms-Exch-EPI-Impersonation – This right is applied to the Client Access Server and grants the Service Account permission to function as an Exchange Impersonation account on that CAS.
ms-Exch-EPI-May-Impersonate – This right is applied on either a user-by-user basis for each of the users that require impersonation to be enabled, or it can be applied on a mailbox database.
The first step is to make sure we have the right setting for the Client Access Server. I have reached the point with Exchange where I do most of my administration from the command line rather than the GUI. I find it much easier to do for a number of things, especially setting permissions. So I am going to give you the command line way to do this. You can do it from the GUI if you stand on your head while juggling balls, whistling the national anthem, and playing a guitar, but that is not my idea of fun. The command line is much easier. I guess that’s what comes of being a Unix geek.
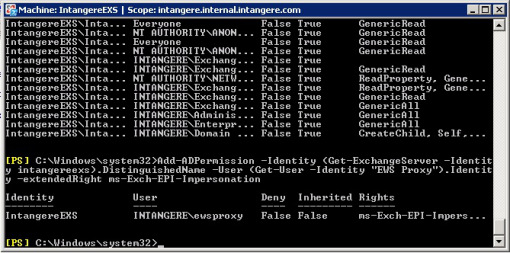
With the release of Exchange Server 2007, Microsoft released the Exchange Management Shell (or Powershell) that allows you to perform most administration functions from the command line. To set the Impersonation permission on your Client Access Server, log on to your Exchange Server machine, and launch the Exchange Management Shell from the Microsoft Exchange Server 2007 program group in the Start menu. At the command line, type the following command (replacing intangereexs with your own CAS and EWS Proxy with the name of your own Service Account):
Add-ADPermission -Identity (Get-ExchangeServer -Identity intangereexs).DistinguishedName -User (Get-User -Identity “EWS Proxy”).Identity -extendedRight ms-Exch-EPI-Impersonation
Note that the identity of the Client Access Server is the name of the machine that hosts it, and the identity of the user is the full name of the user. If you don’t know what the user’s full name is, you can type Get-User at the command line, and you will get a list of all the known user names.
If the command succeeds, you should see a message similar to that at the bottom of the window below:
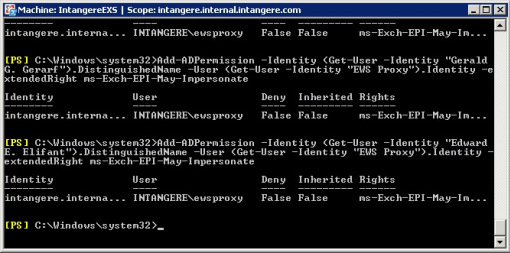
The next step is to set the permissions on each user for which we want to enable Exchange Impersonation. Again, from the command line, we will use the Add-ADPermission commandlet, except this time we are adding the right to the user, not the CAS server. Below are the 4 commands that I used to set these permissions.
Add-ADPermission -Identity (Get-User -Identity “Freddie F. Frogg”).DistinguishedName -User (Get-User -Identity “EWS Proxy”).Identity -extendedRight ms-Exch-EPI-May-Impersonate
Add-ADPermission -Identity (Get-User -Identity “Harriet H. Hippo”).DistinguishedName -User (Get-User -Identity “EWS Proxy”).Identity -extendedRight ms-Exch-EPI-May-Impersonate
Add-ADPermission -Identity (Get-User -Identity “Gerald G. Gerarf”).DistinguishedName -User (Get-User -Identity “EWS Proxy”).Identity -extendedRight ms-Exch-EPI-May-Impersonate
Add-ADPermission -Identity (Get-User -Identity “Edward E. Elifant”).DistinguishedName -User (Get-User -Identity “EWS Proxy”).Identity -extendedRight ms-Exch-EPI-May-Impersonate
Assuming you have set the permissions properly, your command window should look something like this:
That’s all that is required to set up Exchange Impersonation for these four accounts and the Client Access Server for Exchange 2007. As I mentioned, you can set the ms-Exch-EPI-May-Impersonate permission on a mailbox store basis, but I would not advise doing that unless you have segregated your users in a way that makes sense for you to do this. The last thing you want is to give a service account permission to read a CEO’s e-mail. That would be a serious CLM – Career Limiting Move.[/vc_column_text][/vc_tab][vc_tab title=”Exchange server 2010″ tab_id=”def1427305949-2-30″][vc_column_text]
Applying Exchange Impersonation Permissions on Exchange Server 2010
Setting up Exchange Impersonation for Exchange Server 2010 is a lot easier than it is for Exchange Server 2007. The Roll-Based Access Control mechanism allows you to define groups of users and assign those groups of users the ApplicationImpersonation role. Once that is done, any new users that are added to the group are automatically assigned the ApplicationImpersonation permission.
MANAGEMENT SCOPE
I have used the term “group” here somewhat confusingly, and I’m going to perpetuate that confusion by using a security group as the basis for defining the permission, but that is not the only way to do this. The ApplicationImpersonation role has to be assigned to a ManagementScope.
So what is a ManagementScope? A ManagementScope is a logical group of users that are defined by a common set of criteria. It is not necessarily an Active Directory Security Group, although, for the purposes of our example, I will be using a security group to define it. You can define the scope to consist of users who meet a certain criteria, such as having a common manager.
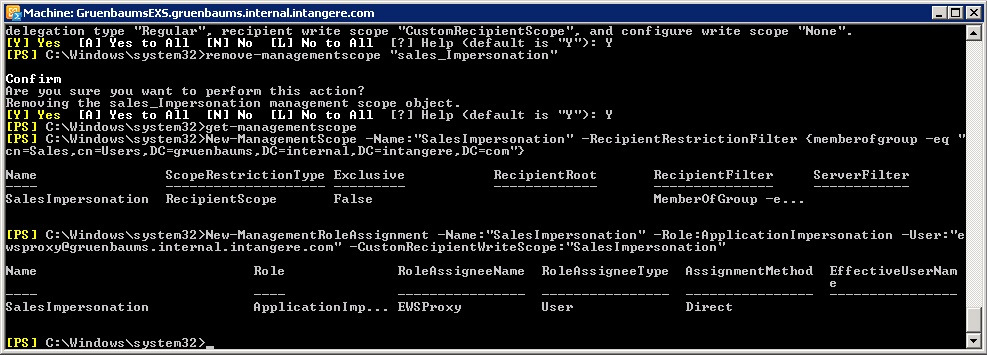
You define a ManagementScope by using the New-ManagementScope commandlet. The RecipientRestrictionFilter parameter allows you to define the criteria that select a list of users. In this case, I am looking for all users that are members of the Sales security group (fully qualified: gruenbaums.internal.intangere.com/Users/Sales). The following command creates a management scope that will only include members of that group.
New-ManagementScope -Name:”SalesImpersonation” -RecipientRestrictionFilter {memberofgroup -eq “cn=Sales,cn=Users,DC=gruenbaums,DC=internal,DC=intangere,DC=com”}
The string at the end of the command line is a Distinguished Name string from the Active Directory that represents the Sales security group. There are a number of different filters that can be applied to create a management scope. The nice thing about this one is that if I add or remove a user to the Sales security group, the scope defined here will ensure that the permissions for the user are affected accordingly.
ROLE ASSIGNMENT
Once the management scope exists, one or more management roles can be applied to the management scope. In this case, I am going to assign the ApplicationImpersonation role for the ewsproxy user to the management scope that I just created, and I am going to call the role SalesImpersonation.
New-ManagementRoleAssignment -Name:”SalesImpersonation”
-Role:ApplicationImpersonation
-User:”ewsproxy@gruenbaums.internal.intangere.com”
-CustomRecipientWriteScope:”SalesImpersonation”
Just to confuse the issue, I called my scope SalesImpersonation, too. So in the command line above, the first occurrence of SalesImpersonation refers to the name of the management role assignment that is being created whereas the second one refers to the name of the management scope that was created in the previous step.
[/vc_column_text][/vc_tab][/vc_tabs][/vc_column][/vc_row]